

为了让这些课程免费,请在这里给老师捐款。https ://customclothingboutique.com/products/donat-to-motley-muse

单击此处可查看有关所有基础知识的初学者深入缝纫课程。https ://customclothingboutique.com/pages/quilting-knowledge
要缝制 Prairie Rose 被子块,您需要遵循以下步骤:
材料:
- 您选择的面料
- 缝纫机
- 线
- 旋转切刀
- 切割垫
- 绗缝尺
- 铁
指示:
-
将布料剪成以下尺寸:
- 四个 5 英寸正方形作为木块的中心
- 八个 2.5 英寸的正方形作为内花瓣
- 八个 3 英寸正方形作为外花瓣
- 四个 2.5 英寸的正方形作为角落
-
取两个 2.5 英寸的正方形作为内花瓣,两个 3 英寸的正方形作为外花瓣。将它们正面相对,从一角到另一角画一条对角线。
-
沿着画线的两边缝制 ¼ 英寸的接缝。沿线剪开,做成两个三角形。
-
将接缝压向较暗的布料。
-
取一个内侧花瓣三角形,将其正面与一个 5 英寸正方形放在一起,作为方块的中心。缝制 ¼ 英寸的接缝。
-
对剩余的内花瓣三角形和中心正方形重复此操作,确保旋转它们,使花瓣交替方向。
-
取两个外侧花瓣三角形,将它们正面相对。在一侧缝上 ¼ 英寸的接缝。
-
在该单元上添加另外两个外花瓣三角形,确保旋转它们,使花瓣交替方向。
-
将接缝压向较暗的布料。
-
将外部花瓣单元与中心方块和内部花瓣单元缝合,确保接缝匹配。
-
将 2 ½ 英寸的角方块缝到外面的花瓣上。
-
按下块并将其修剪为 12 ½ 英寸见方。
-
重复此操作,制作出您所需数量的 Prairie Rose 被子块。
-
按照所需的布局排列块并将它们缝合在一起。
-
将被面、填充物和被里层叠放,然后根据需要进行缝制。
-
用您喜欢的方法将被子缝制起来,然后欣赏美丽的 Prairie Rose 被子!
这是制作半正方形三角形的绝妙技巧,无需直接操纵三角形的弹性偏差。它利用两个易于切割的正方形产生两个半正方形三角形。
在较浅的布料背面,用铅笔从一角到另一角斜着画一条线。

将一对浅色和深色方块叠在一起,正面朝上。在线的两边各缝上 1/4 英寸的接缝余量。

你最终会得到类似这样的结果。

现在沿着对角线剪开。

将接缝压在一起以固定接缝。然后朝最暗的布料方向按压。
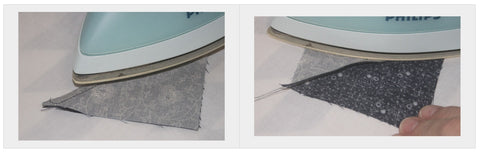
要将木块修剪成精确的尺寸,请将接缝处的对角线 45° 角与尺子对齐。

然后用旋转切刀小心地修整您的木块。

制作完美四块拼布的秘诀在于熨烫接缝,这样接缝连接时它们就能对接在一起。如果您想制作一块拼布被子,您可以通过切割单个方块来制作四块拼布,或者只需用预先连接的布条制作几个方块即可。我将向您介绍这两种方法。

按照所需尺寸剪下两个 A 方块和两个 B 方块。链式拼接,将 A 方块与 B 方块正面朝内连接,留出 1/4 英寸的接缝余量。向深色布料方向压合。
这是你的结果:

这也是切割预连接条带以创建两个单元的结果。
为了制作标准的四块补丁,从预连接条带上切下的单元的宽度与原始条带的宽度相同。
将所有接缝压向深色织物,使接缝对接。
取两块 A/B 布,正面朝上,接缝对接。如有必要,用别针固定。用 1/4 英寸的接缝余量连接,然后熨烫。

更广泛的应用:
您可以将这种技术应用于所有类型的四块拼块。只要拼块具有 4x4 网格,无论有多少块,基本原理都适用。每块相邻的四块拼块都会重复这一操作。只要您继续以相反的方向按压接缝,拼块就会变得容易。
以下所有块均有 4x4 网格,可以拼接成四个块。

九块拼布的秘诀在于熨烫接缝,使它们在连接时对接。
按所需尺寸切割 5 个 A 正方形和 4 个 B 正方形。
链式拼接,将 B 方块与 3 个 A 方块正面相对,接缝余量为 1/4 英寸。暂时无需熨烫。
其结果将是:

接下来,取出剩余的 A 和 B 方块,然后进行链式拼接,将它们连接到这些单元,正面朝内,接缝余量为 1/4 英寸:

您的结果将是:

为了加快速度,您可以切条。
将 A 和 B 条带剪成合适的宽度,然后将它们连接成 A/B/A 和 B/A/B 单元。请注意,您需要两倍长度的 B/A/B 条带,因为有两个这样的单元。将条带连接后,正面朝内,留出 1/4 英寸的接缝余量。将每个接缝压向深色面料。
剪开预先连接的条带以创建九个补丁所需的单元:

您将获得与上述相同的结果,但是这种方法更快。

要制作标准的 9 号补丁,从预连接条带上切下的单元的宽度与原始条带的宽度相同。
将所有接缝压到深色织物上,使所有接缝都对接。
将 B/A/B 单元与 A/B/A 单元用对接缝连接起来,正面朝内,接缝余量为 1/4 英寸。
最后的中央接缝的方向是可选的。但要根据较大方案中块的放置情况进行指导,并尽可能使用熨斗来促进接缝接头的发芽。
更广泛的应用:
就像 4 块拼布一样,您可以将此方法应用于各种 9 块拼布。只要拼布有底层 3x3 网格,无论有多少块,基本原理都适用。它会一遍又一遍地重复,每个 9 块拼布都与下一个 9 块拼布相邻。只要您继续以相反方向成对按压接缝,拼布就会顺利进行。
试试这些。每个块都有一个底层 3x3 网格,可以拼成 9 个块。

有时,像上面这些复杂的块会让人看不清哪个方向是暗的。只需记住基本的熨烫计划是:

如何调整被子块的大小:
0 条评论